Policies
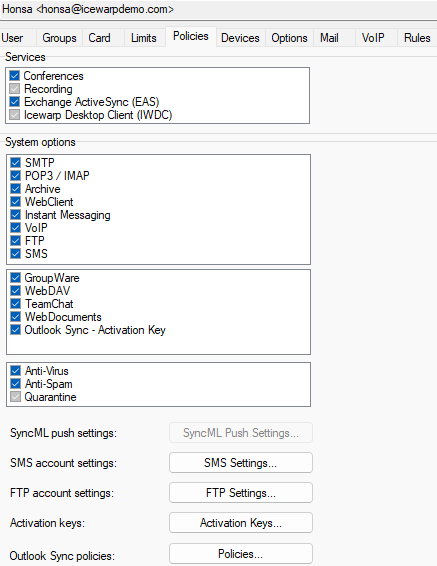
Policies tab lets you enable or disable selected services for the
user. These settings are also considered by the licensing engine when comparing
the license size with the amount of activated user seats – only user accounts
are licensed.
Note: You can select multiple users from the middle panel
in Management using Shift+click and
Ctrl+click to perform a bulk
modification.

Figure. User level management: Policies tab.
|
Services and System options
|
Check the services you want to enable on the user
level.
Note: Checkboxes are enabled only if the accesses to
services are granted on higher levels (domain).
Note: To enable activation keys for IceWarp Outlook Sync
and/or IceWarp Desktop Client, it is necessary to have checkboxes under
the {domain} >
Services tab checked first.
Note: After upgrade from 10.3.x to 10.4 in the case the
previous access mode was Accounts from the list,
the appropriate services appear disabled here, but settings are kept. To
find out these settings, use API
Console (global level – File
menu) – filter variables using the filter value of processinggroup.
In the case the Advanced mode was
used, users will have their modes set to [service_user10.3.x XNOR service_domain10.3.x] in
10.4.
Note: In the case an account is created as POP3 one, you
will not be able to check even the Desktop Client > Activation Key
checkbox (besides other boxes in this section). If you want to provide the DC
license to the appropriate user, set his account to POP3/IMAP at least
temporarily.
|
|
SyncML push settings
|
This button opens the Device dialog that lets you set the SyncML Push settings.
|
|
SMS account settings
|
This button opens the SMS
Account dialog where you can set SMS account options.
|
|
FTP account settings
|
This button opens the User dialog where you can define FTP Service
settings.
|
|
Activation keys
|
Clicking this button opens the License dialog (see below) that allows you to
transfer activation keys for IceWarp Outlook Sync and IceWarp Desktop Client to the user. The Activation Keys can be distributed by the
following means:
-
Email, click Activation Keys... and Send Key to User by Email
-
Available to the user from WebClient > ⚙Options > Licenses
-
Automatically installed by SmartDiscover with no user intervention
Once you have obtained a license with some amount
of possible client activations (see Help >
License...), check Outlook Sync >
Activation Key or Desktop Client >
Activation Key checkbox for users that should be allowed to activate the
corresponding application. This will automatically generate an Activation
Key for the user and make it available by SmartDiscover and WebClient.
You need to check the Activation Key checkboxes in
the Services tab on both the domain
level and the user level to have the Activation Keys generated automatically.
You can still have them unchecked on either level and generate activation
keys manually in Activation Keys... – Generate
Key.
Note: Unchecking the checkbox will not unregister an
already licensed application, it will only disallow the distribution of
the Activation Key by SmartDiscover and WebClient.
|
|
Outlook Sync policies
|
Click the Policies button to open the Policies dialog.
Here, you can set provisions for the appropriate IceWarp Outlook Sync user. It is possible to Force settings (not possible
to change by users) or to Set as default (users can change these
recommended values).
For detail description of these options, refer toIceWarp Server Outlook Sync User Guide >
IceWarp Options > Settings section.
|
SMS Account Dialog
These settings are used in the case the SMS service on the
domain level ([domain] – Policies) is
enabled.

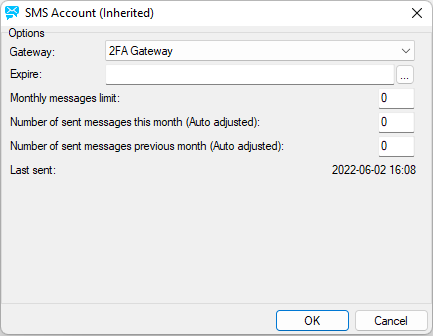
Figure. Policies tab: SMS Account Dialog
|
Gateway
|
Select from the list. (Gateways defined under the
SMS – General tab.)
|
|
Expire
|
Select the date of the account
expiration.
|
|
Monthly message limit
|
Enter the maximum number of messages that can be
sent per month; if "0" (zero) is left, there is no limit set.
For example, evaluation accounts can be created by
limiting a number of sent messages to 10 and/or setting a 7 day
expiration.
Note: Even if set on the domain level, this limit is
applied per user. Exmple: if set to 1000 on the domain level, each domain
user can send 1000 messages per month (unless the user has set this limit
individually).
|
|
Number of sent messages this month (Auto
adjusted)
|
The use is two-fold:
-
Message counter. The value shows how many messages have been sent this month by users or groups within this account. It is automatically reset to 0 at each month's end.
-
Counter reset. Type 0 or any other value and click OK to reset the monthly counter.
|
|
Number of sent messages previous month (Auto adjusted)
|
-
The value shows how many messages have been sent in the previous month by users or groups within this account. If there has been no activity in that month, it is automatically reset to 0 at each calendar month's end.
-
Counter reset. Type 0 or any other value and click OK to reset the monthly counter. (May be meaningful for invoicing.)
|
|
Last sent
|
Shows the date and time when the last message was
sent through this SMS account.
|
User Dialog
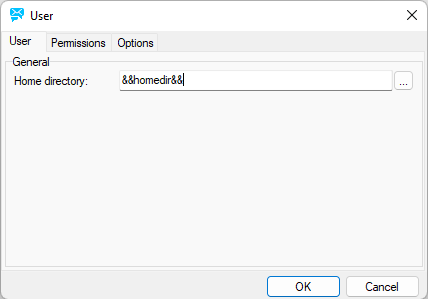
The User dialog consist of three tabs: User, Permissions and Options.

Figure. Policies tab: User Dialog.
|
Home directory
|
You have the following possibilities:
-
Leave the field blank – same as the next option
-
Use the &&homedir&& variable – users are directed to their email folders ({InstallDirectory}/mail/{domain}/{user})
-
Use the &&sitedir&& variable – users have access to the whole site, by default they have the read, write and delete rights
-
Enter some path – users are directed to this directory regardless of the site(s) defined lower
|


